阅读提示:coyote linux(北美土狼)是一款非常小巧方便的软件路由器和防火墙软件,它以一张软盘为载体,可以使用一些比较古老的机器做为代理防火墙,而它的功能却很强大,本文简要介绍一些coyote linux的安装及配置使用。
coyote linux(北美土狼)是一款非常小巧方便的软件路由器和防火墙软件,它以一张软盘为载体,可以使用一些比较古老的机器做为代理防火墙,而它的功能却很强大,本文简要介绍一些coyote linux的安装及配置使用。
首先到http://www.vortech.net/ 上下载coyote linux的最新版本,到目前为止,最新版本是2.4.0。注意:其网站上提供了若干平台的制作版本,我们一般采用Windows Disk Creation Wizard v2.24.0版本,意思是在windows下的生成版本。
下载后解压缩,运行coyote.exe文件。开始制作软盘过程
1.开始是欢迎画面,熟悉在windows下安装软件的都知道下一步该怎么做,呵呵(见图1)。
 (图1)
(图1)
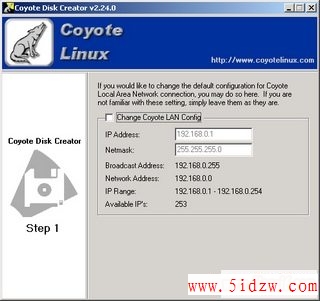
2. 接下来的选项是进行coyote linux连接局域网的网卡的ip设置,这个需要根据自己内部ip地址的分配情况进行设置。例如:如果内部网的ip是192.168.3.0/24,这里就要把ip设置成192.168.3.X。而其他的机子要将网关设置成这个地址。(见图2)
(图2)
3.这一步是设置管理员的密码,建议密码不要过于简单。长度在6位以上,并且数字和字母结合。以增加安全性(见图3)。
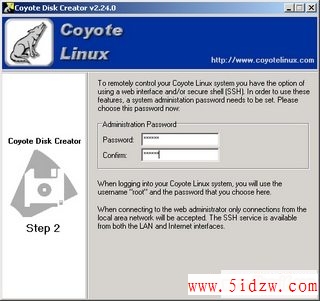 (图3)
(图3)
4.接下来是选择日志服务器的地址,我们一般用不到这项功能。所以这个留空就可以了,什么也不用添,点击下一步继续(见图4)。
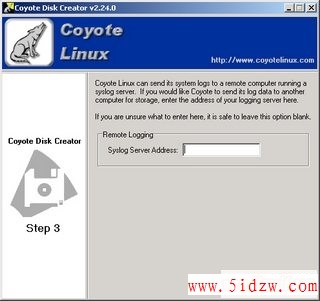 (图4)
(图4)
5.下面是进行互联网的上网设置,上面的四个选项分别对应四种上网方式,我们一般用的都是adsl拨号上网或者静态IP上网。这两种方式的设置如图5和图6
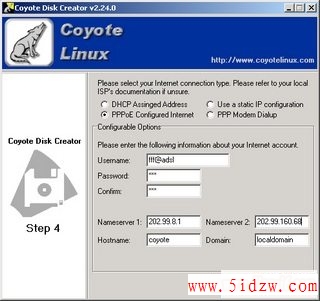 (图5)
(图5)
 (图6)
(图6)
6.接下来是选择是否将coyote linux设置成一台dhcp服务器给其他的机器分配ip地址。可以根据自己的实际情况决定用还是不用(见图7)
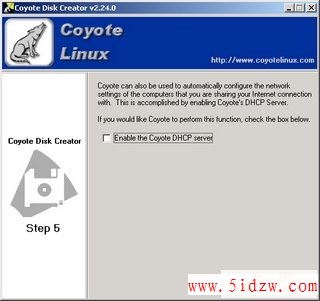 (图7)
(图7)
7. 下面是选择你的网卡,根据你的网卡类型,系统将相应的驱动编译进软盘里。上面的是连接局域网的网卡,下面的是连接互联网的网卡。如果在下拉列表里找不到你的网卡驱动,可以点击旁边的“select”按钮进行详细的选择。由于现在的网卡一般都是pci接口的网卡,所以IO地址和中断号不用选择。都选择好以后,点击next继续。(见图8和9)
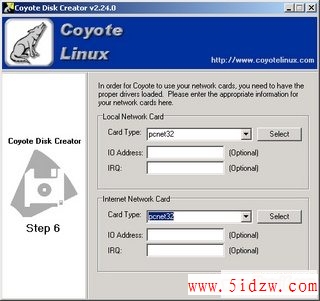 (图8)
(图8)
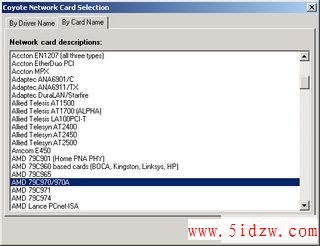 (图9)
8.语言的选择。一般情况下选择chinese。如果你觉得你的英文水平很高。选择english也是不错的。(见图10)
(图9)
8.语言的选择。一般情况下选择chinese。如果你觉得你的英文水平很高。选择english也是不错的。(见图10)
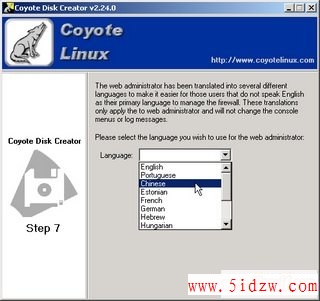 (图10)
(图10)
9.接下来将软盘放进软驱,点击“Creat Disk”按钮,稍等片刻。coyote linux软盘就大功告成了(见图11)。
 (图11)
(图11)
10.用这张软盘启动一台打算作为路由器的机器,在bios里设置成软驱启动。启动完成后,你的客户机已经可以上网了。(见图12,13)
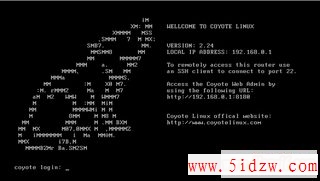 (图12)
(图12)
 (图13)
(图13)
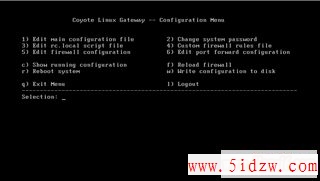
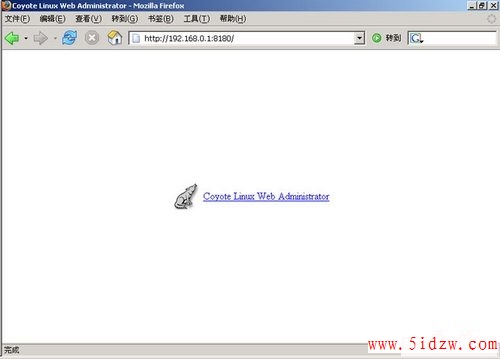
11.coyote linux支持web管理。在内网的一台电脑上打开ie,在地址栏输入http://192.168.0.1:8180,这里192.168.0.1为 coyote linux的内网地址。就可以通过web来对coyote linux进行配置。(见图14,15,16)
 ,软件路由器coyote linux安装使用指南